- Features by Edition
- Latest Features
- Licensing/Activation
- Installation
- Getting Started
- Data Sources
- Deployment/Publishing
- Server Topics
- Integration Topics
- Scaling/Performance
- Reference
- Guide to Views
- Keyboard Shortcuts
- Dates & Times
- Manage Fields
- Tokenised Data
- Using Formulae
- Scripting
- Mapping & GIS
- Advertising Options
- Legacy User Guide
- Translation Guide
- Specifications
- Video Tutorials and Reference
- Featured Videos
- Demos and screenshots
- Online Error Report
- Support
- Legal-Small Print
- Why Omniscope?
|
|
|
|||||
|
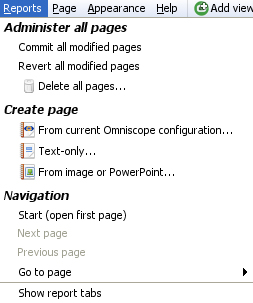
This is a static archive of all KB articles for Omniscope 2.9 and earlier; the new knowledge base is here. 2.4 Reports MenuReports Menu Commands (2.4)Creating a presentation from your fileApplies to verson 2.4 only; most of these commands are now accessed from the Tab Menu 2.5 or the "+" icon to the right of the final tab. The Main Toolbar Reports menu provides access to all the commands used to create and administer Report Pages configured in the file. If no Report Pages are yet configured, you will see only the Create Page heading on the menu. If Omniscope is currently displaying a combination of views, queries, variable settings, etc. that you would like to make persistent, you should choose to create a Reports Page. Professional and Enterprise Editions can create any number of persistent, tabbed Report Pages, with sectioning and other advanced tab options.
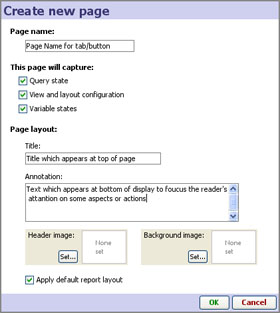
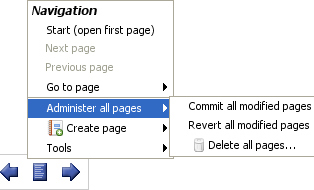
The commands below are also accessible from the Reports Navigator, which appears in the lower right-hand part of the screen when the file is in Reports Mode. These commands are more fully documented below in the Reports Navigator section. Administer all pages - if you already have Reports Pages configured in your file, you can manage modifications to all pages, or delete them all using these commands. Navigation: Start ; ...Go to Page - if you already have Reports Pages configured in the file, these commands allow you the access any Page, from the start or from a drop-down menu that appears on the right of the Go to Page command. Show report tabs - this option displays a tab for each Report Page across the top of the Main Toolbar, even if you are also displaying buttons in the Side Bar Reports Panel. Creating Report PagesTo create a Report Page from the current display in Omniscope, or as a text or image slide/imported PowerPoint slide, use Reports > Create Page from the Main Toolbar Reports menu. If you have revealed the Sidebar Reports Panel, you can also click New to access the Create New Page wizard:
Annotation: explanatory text to focus the readers' attention on specific aspects or actions. You can edit this at any time by double-clicking on the annotation text field. Header/Background Image - adds images to each Report Page; Header images display at the top of the page, Background images can be faded and display in views that otherwise display blank backgrounds. For more information on fading background images, see Page menu commands. Apply default report layout: If you leave this box ticked, Omniscope will hide the View Toolbars and increase the margins around the views for a cleaner display. If you wish to preserve the existing settings, untick this box. Once configured and named, each pre-defined, persistent Report Page appears anytime the user clicks on the top report tab, or the button next to the Report Page name in the Side Bar Reports panel, or uses the Report Navigator menu, which appears faintly in the bottom left corner of the display in Reports Mode. Reports Navigator
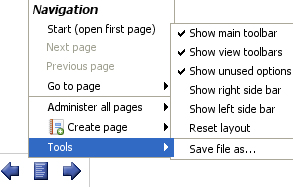
Reset layout - returns the page layout to the defaults, such as the Main Toolbar displayed, Report Tabs displayed, etc.
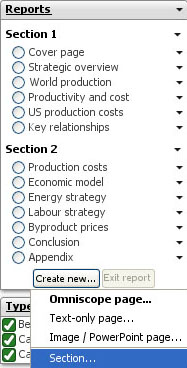
Report SectionsFrom the optional Sidebar Reports panel, you can group your Reports into sections, as shown in this example file. To create a section name, choose Create New > Section at the bottom of the Sidebar Reports panel. Rename or delete sections using the black triangle drop down. Drag and drop to reorder reports in sections.
Reports with independent queries and viewsYou can also mix query-only and view-only reports. To create such query-only or view-only report items, choose Create new Omniscope page from the New... button in the Reports panel, and select either Query state or Views and layout configuration. This example file illustrates navigating a set of query-only reports, grouped under a section name in the Side Bar Reports panel, and a set of view-only reports configurations, also grouped independently. This allows you to configure a set of different view configurations (by task, or form of analysis, such as 3 Web Views, or a Graph and a Web View, or 2 Pie Views) and an independent set of queries (such as last week's, or last month's trades, or erroneous trades) enabling users to navigate any combination independently. For example, a user might open Query A then Views X. They can then choose to either change to a Query B while keeping Views X displayed, or Views Y while keeping Query A displayed. Note: the buttons in the Sidebar Reports Panel only highlight the last report item opened. If you open Query A then Views X, you will see only Views X selected in the Reports Panel. The view configuration from Views X will be showing and the filters will continue to represent Query A correctly. But because only Views X is actually selected, manipulating the query will not affect Query A. |