The left side of the Main Toolbar contains all the top-level command menus. When no Omniscope data file is loaded, the Main Toolbar displays only the command menus. These commands are generally not needed to navigate an Omniscope file prepared for you by someone else. Documentation of all the commands on these menus can be accessed from the Commands Reference page or by following the links below:
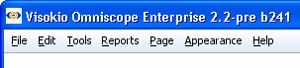
| File | Edit | Tools | Reports | Page | Appearance | Help |
Main Toolbar navigational features
Whenever an Omniscope data file is loaded, to the right of the command menus, the Main Toolbar also displays a selection of navigational command icons and functions used to explore Omniscope files:

 Add View -Used to add an additional view to the current display. To remove a view from the display, click on the [X] in the upper right hand corner of the view. To change a window from one view to another, click on the view name and select the view you want from the drop-down menu. If you want to add a view showing another Universe, click on the Show other data universes option to display a grid of all views and universes. There is no upper limit on the number of views you can open in Omniscope, but display screen size limitations encourage using multiple Report Pages to display different combinations of views, rather than crowding the working display with too many open views. More on creating Report Pages.
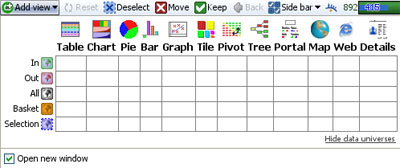
 Reset - Omniscope files are flat tables of data, with records (rows) and fields (columns). One of the objectives of navigating an Omniscope file is to select and focus on only a certain subset of records (rows), rather than all the records in the file. The Reset button removes all of the filtering criteria you may have expressed, and returns the current display views to show all the records in the IN universe. It is very important to always reset your data before filtering, so that all qualifying records will be considered in your subsequent query. Unless you say otherwise, Report Pages remember their queries, so if you want a Report Page to open showing all the data, make sure to Reset the views and commit the changes before you save the file.
 Deselect - Removes all records from the blue SELECTION universe, and greys-out the option to do Move or Keep operations on selected records. Omniscope filtering using power queries depends on 4 basic operations: Select (or Deselect), followed by Move or Keep, and perhaps a Reset. Every view provides ways of selecting one or more records using just a mouse. In most views, you can also Deselect by clicking again on one or more of the selected areas or groups of records. It is not necessary to use the global Deselect on the Main Toolbar unless you wish to clear all selections.
 Move - Selecting/deselecting records is a precursor to deciding whether to Move the selected records OUT of further consideration. If you are working in the IN universe, the Move command moves all selected records OUT of consideration, where they stay until the display is Reset. If you are working from the OUT Universe, the display will change the colour of the Move icon to green, since moving records from the OUT Universe will return them to the green IN Universe. If you are working from the black ALL universe, the display will change the Move button, substituting OUT for Move, signifying that moving records from the ALL Universe places them in the OUT Universe, if they are not already there. Remember that the black ALL Universe always contains all records and does not change.
 Keep - the opposite of Move, if you are working in the IN Universe, the Keep command keeps only the selected records IN consideration, and moves all other unselected records OUT of consideration. If you are working from the OUT Universe, the display will change the colour of the Keep icon to red, since it will keep selected records in the OUT Universe and will return all others to the green IN Universe. If you are working from the black ALL Universe, the display will change the Keep button, substituting IN for Keep, signifying that keeping records from the ALL Universe places them in the IN Universe, if they are not already there. Remember that the Black ALL Universe always contains all records and does not change.
 Back - like with a browser, you can go back to the previous display at any time by pressing Back.
 Show Side Bar - clicking this icon gives you the option to show or hide the Side Bars on one or both sides of the current display. You can choose to display a Side Bar on the right, the left or both sides of the display. If you display both Side Bars, adding a device to one Side bar display will remove it from the other.
 DataPlayer link - used to export data sets to Omniscope's companion application FeatureFinder (integrated as DataPlayer View in 2.4+). The separate application converts your data into interactive Flash .SWF DataPlayers suitable for embedding in web pages and offline documents such as PowerPoint, Adobe Acrobat .PDFs, Excel etc. DataPlayers in version 2.3 do not scale to more than about 5-10,000 typical records, so you may have to use Omniscope to divide your data set into smaller sets before exporting the data to convert as DataPlayers.
 Barometer - upon opening a file, it is useful to know how many records are in the data set. As you filter, it is useful to see how many records have been kept IN consideration, and how many moved OUT. The barometer is a visual gauge that shows the total, as well as the split between IN and OUT Universes. More on Data Universes
 Basket - the basket is a 'parking place' where you can put selected records, such that they will stay there even if you Reset the display. At any time, you can open the Basket and see the records you have placed there.
 Help screen - click on the help icon to see what the publisher or re-publisher of the file may have to say that will help you understand more about the file.
 Publisher logo/ link - if you are publishing or re-publishing an .IOK file, you can put your own logo here, and link it to your website. See Appearance > Branding > Add Corner Logo and Set Publisher link (for best results, use a logo 19 pixels high).