- Features by Edition
- Latest Features
- Licensing/Activation
- Installation
- Getting Started
- Data Sources
- Deployment/Publishing
- Server Topics
- Integration Topics
- Scaling/Performance
- Reference
- Guide to Views
- Keyboard Shortcuts
- Dates & Times
- Manage Fields
- Tokenised Data
- Using Formulae
- Scripting
- Mapping & GIS
- Advertising Options
- Legacy User Guide
- Translation Guide
- Specifications
- Video Tutorials and Reference
- Featured Videos
- Demos and screenshots
- Online Error Report
- Support
- Legal-Small Print
- Why Omniscope?
|
|
|
|||||
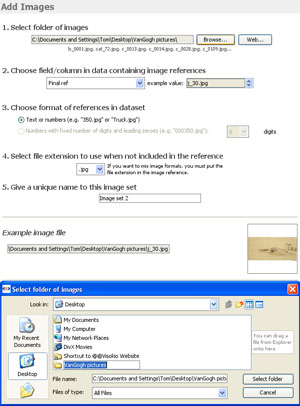
Settings > ImagesSettings > ImagesBefore you can display images related to your data set, you must first associate one or more image folders with your IOK file as named image sets. Preparation for this involves saving a set of images in a single folder with a consistent naming convention, such that one of the columns of your IOK file (it may be a column included just to hold the names of the images) contains the same text values as the file names of the images in the folder, i.e. 'picture1', 'picture2' etc. Any image naming convention can be used, so long as the same exact text strings are present in one of the columns of your data set. You can omit the file extension from the data column if all the images have the same extension, e.g JPG or GIF. If the images are mixed format, the names in the data column must include the file extension for at least one of the formats. There are 3 ways to display images in Omniscope:
It is also possible for Omniscope to display multiple images per record, provided you have entered multiple values in the image reference cell by declaring the field (column) to be Tokenized (for more detail, see Tokenized data). If you enter multiple image references per cell, the Tile View will show the first image by default, but you can change this in the Tile View View Tools > Advanced sub-menu. The Details View, pop-up windows and Slide shows will all display the tokenized images for each record. The Tools > Images menu contains two options: Add Image Set- launches the Add Image Set wizard documented below. Modify Image Set (only visible if an image set is already associated with the file)- launches the Edit Image Set wizard, which is effectively the same as the Add image set wizard. The modify image set option is usually used to re-import or re-embed an image set using the Refresh embedded images button at the bottom. Warning: Only use this command if you are sure you know the location of a complete new image set, ideally containing images at the original resolution, so that you can remove the old one and replace it with a new one. Using the Add/Edit Images wizard
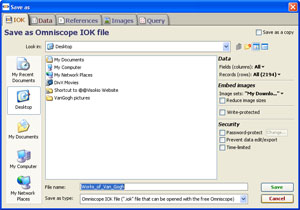
Viewing ImagesTo see your image set displayed, go to Saving/reducing image sets to manage file sizeOnce you have associated and image set, you can save the IOK file with your images embedded. You can also experiment with the trade-offs between file size and image clarity/resolution when you reduce the image sizes to reduce the size of the IOK file. To save a version of your file click File > Save as IOK. The File Save wizard will appear:
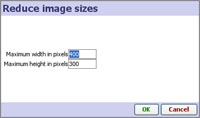
If you embed large numbers of large images without reducing their size, the resulting IOK file can become far too big. In general, images can be substantially reduced from their original size without affecting the quality of the display on computer monitors. To test the effects of reducing the image file sizes, tick Reduce Image size. Give the new version of the file you are saving with reduced embedded images a name, such as 'My File with max picture size 200x150.iok'.
The size of the images displayed is not affected as much as the resolution, since Omniscope manages the sizing of the images dynamically within each display. Testing Image QualityOpen the new version of the file and close all the open views except the Tile View, which should be configured to display the now embedded image set My Downloaded Images. On the Tile View Toolbar, select the movie camera Slide show icon to the left of the Add to basket icon far right. Click Start slide show and choose full screen sub-option. Look at the image quality on your screen. If it is acceptable for the audience/screen resolutions you intend, consider reducing the images more to reduce the IOK file size further. If the image quality full screen is not acceptable, you may have to reduce the maximum size of the images less (increasing the file size), or configure the views such that images are never displayed so large. To do this, repeat the steps above, and set larger maximums in the Reduce image size dialog. |