Applies to 2.4 only; most of these options are now on the Settings Menu 2.5 [1]
The Main Toolbar Tools menu and sub-menus group together commands and options for managing data refresh, language settings, 'brushing' or fading of unselected records, display of individual record-level details, links to related content and services outside the file, associating image sets with the file and many advanced configuration options.
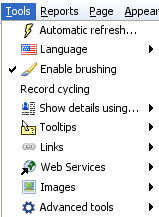 | Automatic refresh - when ticked, displays the Automatic refresh drop-down management menu and Hold button on the right side of the Main Toolbar. |
In addition to using the Details View, there are various options for showing record-level details.

The default (whenever the Details View is not open) is to display details using the pop-up window. If Sidebars are visible, there are options to display details panels at the bottom of either one (but not both) of the Sidebars. For more information, see Viewing Details [4]
Tooltips are temporary text displays that appear whenever you hover your mouse over a marker or other representation of one (or a group of) record(s) in the data set. Using the drop-down pick list, you can select which field values will be displayed whenever Tooltip displays are visible.
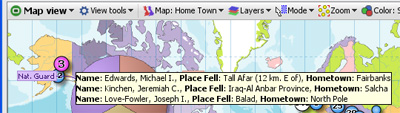
Tooltip displays are Report Page specific. If you are in Reports Mode, the selections you make will be remembered and the selected values will appear in all Tooltip displays on that Reports Page. If you Exit Reports, the Tooltip displays will revert to the defaults you set for the file. Note: Use Tooltips sparingly...selecting too many field values to display will can create large blocks of text values that obscure too much of the open views.
You can also choose to display associated image sets as Tooltips:

To learn how to associate image sets with your Omniscope files, see Tools > Images below.
Links extend your file users' experience to include content not contained within the Omniscope file itself. By adding links, anyone can integrate related external content (documents, files and web pages) into their Omniscope files, with one-click access via their local network, and the open web.
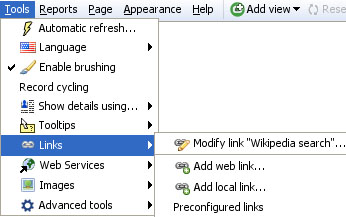
You specify links and make them available for use within your Omniscope file using the Add web link, Add local link and Preconfigured links dialogs. For more information, see Tools > Links [5].
Web Services are data processing services that use Internet standards to post data to a remote server, which usually delivers a response in web page format. Popular examples of Web Services in action include submitting text to a search engine and receiving the results page, or submitting stock tickers to view price charts. (definition of Web Services [6]).
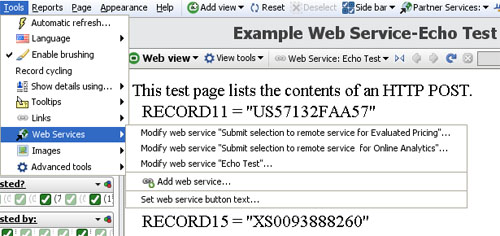
Omniscope is a 'hybrid' web/desktop application that is easy to integrate with Web Services. In addition to the preconfigured free web services (that accept a single value text string input) available on the Links menu, there is also a useful multi-record submit Web Service via HTTP POST available in Omniscope. The Tools > Web Services dialogs permit you to configure and edit Web Services that expect multi-record input to work seamlessly with your Omniscope files. Accepting the defaults under Add web service will configure an 'echo test' service (hosted by Visokio) in which our server repeats back a list of references you have selected in your local Omniscope file. More information on configuring and using web services with Omniscope is available in Tools > Web Services [7]and the Web View [8] subsection on using Web Services [9].
Before you can display images, you must associate one or more folders of images with the .IOK file as a named image set. Preparation for this involves saving a set of images in a single folder with a consistent naming convention, such that the same text values are present in one of the columns of your .IOK file (it may be a column included just to hold the names of the images). It is also possible for Omniscope to display multiple images per record, provided you have entered multiple 'tokenized' values in the image reference cell.
There are 3 ways to display image sets in Omniscope:
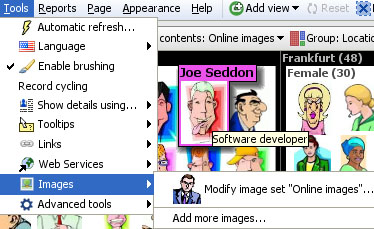
Once you have associated one or more image sets (each with single or multiple images per record) with your file, you can display these images in various views:
For more detail, see Adding Image Sets [10]
Omniscope can be used with any language. You can use existing translations, modify existing translations, or create your own translations files based on those that already exist.
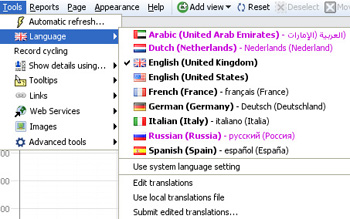
Language selector - choose from the list of available translations
Use system language setting - tick this option to start Omniscope with the language setting specified in the operating system. If a user selects a different language, it will override and untick this setting. That user's installation will open using the preferred language until reset using this command.
Edit translations - opens your local copy of the embedded EditedLanguages.iok translation file. You can make changes to the translations text in this file, being careful to follow the Guidelines in the Translations Guide [11]. When you have finished editing, choose File > Save (not Save As) to save the edited file in its original location. In Tools > Languages, ensure your edited language is selected, then close and re-start Omniscope to see the changes you made via the edited file.
Use local translations file - if you open the embedded EditedLanguages.iok file to make and save changes, this option will be ticked. To revert to showing the default translated text, untick this option and restart Omniscope.
Submit edited translations - if you would like your translations/edits to be included in the default for a given language, or added to the menu as a new language or variant, submit your EditedLanguages.iok file to us using this command.
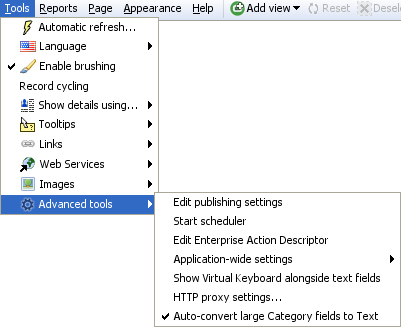
Additional Tools sub-menus are available from the Advanced Tools menus. Note: Some of these commands are only available in the Enterprise Edition.
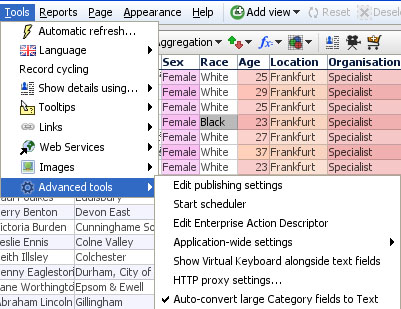
For more detail on these and other Tools > Advanced tools sub-menu commands, see Advanced Tools [12]
The Main Toolbar Tools > Advanced Tools menu and sub-menus include a number of important options, some of which (Edit publishing settings, Start Scheduler, and Edit Enterprise Action Descriptor) are only available in the Enterprise Edition and are discussed in the Enterprise Edition - Advanced Tools section below.
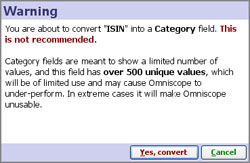
 | Show virtual keyboard alongside text fields - tick to enable users to enter text without keyboards HTTP Proxy Settings - useful for activation, updates and automatic bug reporting. For more information, see Proxy Settings [13] in our KnowledgeBase. Autoconvert large Category fields to Text - by default, Omniscope will not treat a Text field (column) containing more than about 200 unique values as a Category field, for performance and other reasons. Sometimes there is some leeway around this depending on the size and composition of your data set, and some views will only display breakdowns by Categories. Unticking this option will allow you to experiment with treating some text fields as very large Categories. |
Warning: There is still a safe upper limit for unique values treated as Categories rather thanText. Trying to convert a field (column) with more than 500 unique values will definitely trigger a warning:
For more information on data typing and converting text fields to categories, see Edit > Manage Fields [14].
The application-wide settings sub-menu is used to configure various aspects of your Omniscope installation that apply to all files you open.
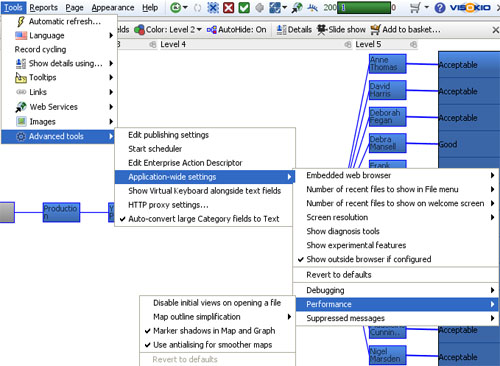
Embedded web browser - allows you to change the installed browser underlying the Web View and Outside browser (see below). Current options include Internet Explorer and Firefox/Mozilla.
Number of recent files to show in file menu - allows you to specify the number of recently-opened files to show at the bottom of the File menu.
Number of recent files to show on welcome screen - allows you to specify the number of recently-opened files to show under Recent files heading on the Welcome screen {version 2.3+}.
Screen resolution - Used to tell Omniscope the type of display screen the file will be used on (Handheld, Projector, Desktop or Kiosk/TV), so that layout, font size etc. can be optimised. This is the same as the display setting on upper right of the the Welcome screen {version 2.3+}. This is not the same as the option to change only the resolution displayed, which does not affect Omniscope's choice of layout, font size, etc. See also the command Appearance > Resize window to [15]: which changes only the resolution displayed.
Show diagnosis tools - this option reveals some additional error reporting options, for example a menu item to report errors on loading images from image sets. We may ask you to enable this to help with troubleshooting.
Show experimental features - every version of Omniscope contains some experimental features which are still under development.Tick this option if you want to reveal (in violet font) and test these features.
Show outside browser if configured... the Outside browser is an Omniscope web browser view which can opens alongside the Welcome Screen before any specific Omniscope file is opened. It is different from Web Views, which are configured within each file to open pointing at pre-defined links/web services as required. The Outside browser feature is used to provide a group of users the ability to browse and select from a library of Omniscope and other data files displayed on a (usually permissioned) web page. For more information, see Using the Outside Browser [16].
Revert to defaults - resets all Application-wide settings menu options to the default settings.
Debugging - used to create log files that record each event in various processes. We may ask you to tick some or all of these in order to generate a log file we can review to help us troubleshoot problems.
Disable initial views on opening a file - this setting enables you to explicitly control, one-by-one, the views that open with your data. It is used to recover files whose initial opening configuration becomes unusable for some reason, or where opening very large files on machines with limited RAM that require the utmost conservation of memory. Warning: If you leave this setting ticked, all files will open with no views showing....use only when dealing with specific circumstances.
Map outline simplification - reveals a sub-menu which allows you to adjust the resource demands associated with drawing and zooming/up-dating maps.
Marker shadows in Map and Graph Views - unticking this will improve performance in some files with very large numbers of markers visible in the Map or Graph Views.
Use anti-aliasing for smoother maps - unticking this will improve performance in some files with extensive use of maps
Reset to defaults - resets performance options to the default settings
The Enterprise Edition contains advanced automation, and file security revenue protection features useful in commercial data publishing:
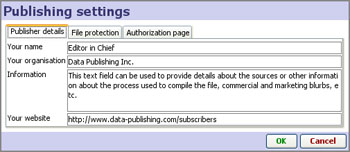
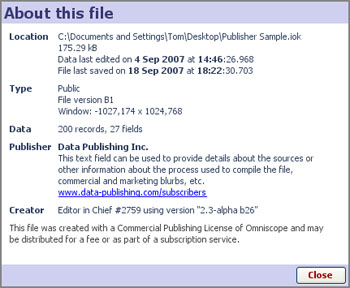
Edit publishing settings - {Enterprise Edition only} this dialog is used to set the publisher identification text and links that will appear whenever a file recipient clicks on File > About on a file produced with this installation.
 |  |
Edit publishing settings: file protection options - {Enterprise Edition only}
Protected- used to prevent data editing, export and copying (including copy-and-paste copying). Other options to time-limit or password-protect files are available from the File > Export or Save as [17] dialog.
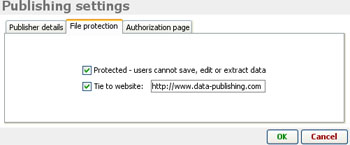
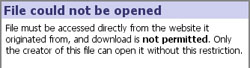
Tie to website - {Enterprise Edition only} enables domain locking, a powerful and effective revenue protection feature. Omniscope .IOK files are free-standing and easily transferred by e-mail, posting/downloading from blogs and websites, etc. Commercial publishers can use this domain-locking feature to require that anyone trying to open their files must be logged in to a specific web site. If the file recipient is not logged in, the .IOK file containing the data will not open, and will display a notice to that effect:
Start Scheduler - {Enterprise only} the Scheduler is Visokio application separate from Omniscope used to automate the refresh, import, merge and publishing/distribution of data files by defining a set of actions performed repeatedly on a specified time cycle. For more information, see Using the Scheduler [18].
Edit Enterprise Action Descriptor - {Enterprise only} the Scheduler uses Enterprise Actions Descriptors XML files, which you can configure using an Enterprise Edition user interface, or manually, based on a exported example specification. [19] Examples of actions which can be automated include:
For more detail, see Creating and Editing XML Actions [20]
Links:
[1] http://kb.visokio.com/settings-menu
[2] http://kb.visokio.com/auto-refresh
[3] http://kb.visokio.com/node/224
[4] http://kb.visokio.com/viewing-details
[5] http://kb.visokio.com/create-links
[6] http://en.wikipedia.org/wiki/Web_services
[7] http://kb.visokio.com/web-services
[8] http://kb.visokio.com/web-view
[9] http://kb.visokio.com/web-view-services
[10] http://kb.visokio.com/add-images
[11] http://kb.visokio.com/translations-guide
[12] http://kb.visokio.com/advanced-tools
[13] http://kb.visokio.com/kb/proxy-settings
[14] http://kb.visokio.com/manage-fields
[15] http://kb.visokio.com/appearance-menu-2-4
[16] http://kb.visokio.com/kb/outside-browser
[17] http://kb.visokio.com/export-files
[18] http://kb.visokio.com/kb/scheduler
[19] http://kb.visokio.com/kb/xml-actions-spec
[20] http://kb.visokio.com/kb/xml-actions