- Features by Edition
- Latest Features
- Licensing/Activation
- Installation
- Getting Started
- Data Sources
- Deployment/Publishing
- Server Topics
- Integration Topics
- Scaling/Performance
- Reference
- Specifications
- Video Tutorials and Reference
- Featured Videos
- Demos and screenshots
- Online Error Report
- Support
- Legal-Small Print
- Why Omniscope?
|
|
|
|||||
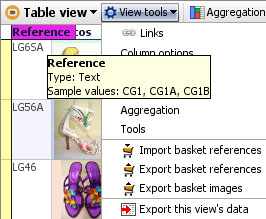
Using the Basket (2.3)Using the Basket Universe - (version 2.3)Putting records in a safe placeRefers to version 2.3 and earlier. From Omniscope 2.4, the basket universe has been superceded by Named Queries which are far more powerful. The terminology "Data universes" has also been dropped. Using Named Queries, multiple baskets can be used. Omniscope classifies every record in the data set as belonging to various 'data universes'. In addition to being in either the IN or OUT Universe, all records are always in the ALL universe. At any given time, any selected records are in the SELECTION universe. Clicking Version 2.3 and previous: Every View Toolbar (except the Web View) allows you to put all (or just one or more selected) records into the BASKET universe, building up a list of records in which you are particularly interested. The purpose of the BASKET universe is to allow you to collect a session-persistent subset of records (rows) that does not Reset. The Basket allows you to use many different Side Bar filter criteria or sequences of power queries to identify records of interest, placing each group of records in the BASKET for 'safekeeping' prior to executing a Reset and applying other filtering sequences or power queries to your data. Although records in the BASKET are unaffected by Resets, the contents of the BASKET not saved on Exit. If you wish to save, share or reuse the contents of the BASKET, you must use the Export or Import basket references (or images) command options which appear on the View Toolbar whenever you are viewing the BASKET target universe:
References are the values in a field (column) that are unique, that is, there is only one reference value for each record (row). (You should always test for duplicate references using the Table View Tools Tools > Select duplicate values option ) Import basket references- if you or someone else using data with the same unique identifiers have previously saved a reference list as the single column of values in a .TXT file, you can re-create the contents of the BASKET in your current Omniscope session using this command to import the external .TXT reference file. Omniscope will move all matching records (rows) into the BASKET universe automatically, and tell you if any references in the external file could not be matched. Export basket references- typically, you use Side Bar filtering and power queries (together with geographic and image-based selection) to identify a sub-set of records on interest, and accumulate them in the BASKET universe. Before you exit, if you want to save (to share or re-use/re-create) the contents of the BASKET, you must use this command to export a .TXT file containing a list of the references currently in the BASKET. Export basket images- Omniscope can be used to manage and select images grouped in folders (image sets) for web-sites, DataPlayers, and other uses. At any time, a selection of images in the BASKET can be exported as a new image folder using this command. Export this view's data- used to export the entire contents of the BASKET universe in various file formats ( .IOK/.IOM, .XLS, .CSV, .TSV, .XML, etc.) using the Export Data wizard. Details View of the BasketYou can enable your users to browse the contents of the BASKET in any view(s), but given that they will have already selected these records and placed them in the basket for closer review, a free-floating instance of the Details View with the records navigation slider revealed can be the most effective. To create a free-floating view, use
|