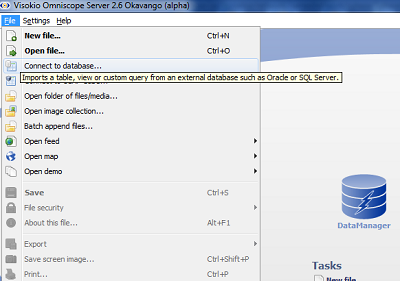
Omniscope includes a Database Connection dialogue to help establish direct connections to database tables and reporting views. The dialogue is accessed via the Main Toolbar: File > Connect to database command. Using the dialogue, anyone can import the results of any SQL statement/query that returns a table.
In order to connect directly to a database (rather than importing a delimited .CSV or .TSV data file that has been exported from a database) you need to know the type of database and its connection details. From the Database Connection dialogue, enter the connection details for your database and choose which database table or reporting view you wish to retrieve data from. By default, this will create a persistent linked data source relationship between this database table/reporting view and the .IOK (Omniscope) files you are creating.
If you connect via ODBC, you can access multiple transactional tables, but only one database. If you connect via JDBC, you can retrieve data from multiple tables in multiple databases, and performance will also be better. If you do not know how to write the SQL query that assembles the reporting view you want to import into Omniscope, ask your Database Administrator to add the query in Omniscope. Every subsequent refresh re-creates the reporting view, drawing the latest information from transactional table(s) within the database(s) to create a single, 'flattened' tabular view of the data for scrubbing, analysis and reporting.
ODBC is a technology for connecting to most databases and requires you to set up a named ODBC data source in Windows. This is the approach needed to connect to an Access .MDB database, for example. In Windows XP, for example, go to Control Panel, Administrative tools and choose Data Sources. Click Add, choose the Access driver (or otherwise, depending on your type of database), choose the appropriate .MDB file and enter a suitable Data Source Name.
If you have a database that supports JDBC, or wish to customise the database import behaviour, you can connect via JDBC using a JDBC JAR driver file obtained from your database vendor or 3rd party. This may need to be specific to your database version as well as vendor. You will need to know how to construct the "JDBC URL" for your database. If your database is covered in the examples, follow the instructions on the example page for your database. If your database is not covered in the example list, see the JDBC generic instructions [1].
The Database Connection dialogue sequence of screens allows you to choose JDBC and enter the JDBC JAR driver path such as:
"C:\Program Files\MyDatabase\Java\JDBC.jar", and the JDBC URL such as "jdbc:mydb:products".
Enter the username and password, if necessary, and choose the table or view you want to look at.
On the next sceen, you can customise the SQL statements, allowing you to JOIN multiple tables on the fly. Only change these values if you are familiar with the implementation of SQL for your database vendor and version.
Relational Databases as linked sources
Any Omniscope file serves as a template file for future data refreshed versions of the file. Omniscope template files remember and refresh from their data sources. If the source is a relational database, Omniscope will re-execute the embedded SQL statement and any subsequent merges, joins and aggregations on every refresh.
To save the connection details you have entered into the Database Connection dialogue for subsequent refreshes, save the current file using File > Save. The saved file will contain a (highly-compressed) snapshot of the data as it was when imported, plus all the database connection parameters, including the SQL statement that returns the table you entered into the dialogue. You can configure refresh behavior each time you (as owner) save the file. You can test refreshing from the database specified in the Database Connection dialogue by choosing Data > Refresh from source.
Unlike text-based delimited data file import (such as XLS or CSV), Omniscope when the linked source is a direct connection to a relational database does not automatically inspect and convert data types. Instead, the data type descriptions of the fields in your database are relied upon to determine data type in Omniscope. If your database declares the field "CUST_AGE" as Text ("Char", "String" or "Varchar"), Omniscope will treat it as Text also. To avoid the need for manual changes, you must structure your source database correctly by declaring the field "CUST_AGE" as a numeric field (for example).
At present, relational database connections in Omniscope only go one way, i.e. they only import a copy of the data in the database table or reporting view. You can make edits but cannot submit your changes directly back to the database table automatically. If you plan to edit/scrub data from databases in Omniscope, you will need to agree a way of submitting documented corrections and additions back to the Database Administrator, usually by exporting a .CSV or a human-readable, parse-able .XML corrections file such that the Administrator can use simple tools to import the corrections made in Omniscope back to the source database.
Suggestions: Don't make too many pre-selections in the SQL statement query assembling the reporting view. Errors in fields can result in some records not being included in the reporting view if you are being selective. Try just dumping all records for each major entity (e.g. people and all fields linked to people, places and all fields linked to places, things and all attrributes linked to things etc.) into a few large reporting views extracted from the database(s). Open these views in Omniscope and save them on the server - effectively creating 'data marts' in Omniscope file format. You can then re-name/correct/scrub and filter/hide unwanted data visually and create 'child' Omniscope files which will refresh from the (server-based) 'data mart' Omniscope files, which are in turn automatically refreshing from the data warehouse.
Warning: Preserving changed and merged data: Omniscope does not currently support partial refresh from database tables/views. Refreshing from linked data sources will overwrite all the data in a given Omniscope file with data from the linked source table only. If you have changed data in the Omniscope file manually, or merged/pasted columns of data from other sources, such as spreadsheets or departmental databases, your changes will be lost on file refresh from the linked source. If you are using Omniscope to merge data from multiple sources, keep your merged data and commentary in separate .IOK, .CSV or .XLS 'merge files' to avoid those values being lost every time the main data file is refreshed from a linked source. You can prevent accidental refreshes from source by not ticking the option to maintain the link to source, but this will also remove your database connection parameters from the Omniscope file.
Omniscope now provides direct MS Access support out of the box, which uses ODBC internally to make the connection.
Microsoft Access 2007 and earlier do not support 64-bit ODBC. Support for 64-bit ODBC is available from Access 2010.
The Omniscope Database Connection dialog accessible under File > Connect to database guides you through the connection parameters.
As with SQL Server 2005, the same configuration applies. You will need to have downloaded and installed the latest Microsoft SQL Server JDBC Driver [2].
The same connection settings for SQL Server 2005 apply.
The Driver jar path is different however, you must enter:
"C:\Program Files\Microsoft SQL Server JDBC Driver 2.0\sqljdbc_2.0.1803.100_enu\sqljdbc_2.0\enu\sqljdbc4.jar" or similar (depending on your installation).
Use "Connect to database" as usual, specifying a username and password, choosing a table, and optionally customising the SQL query.
As with SQL Server 2000, your database server must be configured to use mixed mode authentication. The server must also have the TCP/IP network protocol enabled. You will need to have downloaded and installed the Microsoft SQL Server JDBC Driver [2]. Do not use the "sa" administrative login; instead create a dedicated user for the database(s) you need to connect to.
Open the Omniscope Database Connection dialog under File > Connect to database. Choose the generic "JDBC" option on the first page.
There is a specific option for SQL Server 2000. You will need to know the database server details (host name and port) and login details (username and password). At present, due to limitations in the Microsoft JDBC driver, your database must be configured to use Mixed Authentication and not Trusted/Windows Authentication (see here [4] for more information).
A: Try the following known solutions:
Below is a guided example to connecting to an Oracle 10g database using the Oracle Thin JDBC driver.
Database version: Oracle 10g version 10.1.0.2.0
JDBC driver: 'Thin' JDBC driver for Java 1.4.
Database server host name: localhost
Database server port: 1521
Database instance SID: “orcl”
Table or View name in database: TEST
Unless you're using a really old version of Oracle this approach should work. Alternatively, see the Oracle 8.1.7 [6] page.
You will need the Oracle JDBC driver. This is a file called “ojdbc14.jar” and is normally installed by default alongside the database server/tools. Alternatively it can be found in the download archive or installation CD, or on the Oracle website. This is a pure Java driver for connecting to local or remote Oracle databases.
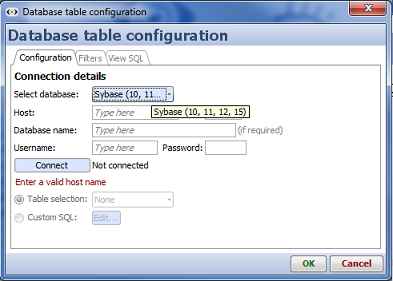
Choose File > Connect to database and the Database Connection dialogue will appear:
Once the Omniscope has finished opening the data, you’ll see a Table, Chart and Pie View, and a set of devices on the right. You can change to different views (visualizations such as Graph and Map) by clicking “Table view”. You can filter data by dragging sliders and clicking checkboxes on the right. The green/red barometer at the top will show you records that have been included or excluded. The Reset button resets all filters to show all records.
It is recommended that you save an IOK file (from the File menu) to save going through the database dialogue again for this particular database table. In future, you can open this IOK file, and optionally refresh data from the database (picking up any updated records).
Omniscope comes with embedded jTDS driver which supprts connectivity to Sybase connectivity.
You do not have to install any drivers for connecting to Sybase.
 |  |
Column-oriented Sybase databases may not be supported by jTDS driver. In this case you may need to use JDBC (Advanced) option.
Please read SybaseIQ section below for more information.
Also try installing Omniscope on the database server directly, if possible, to rule out networking issues and to ensure you have the correct database connection settings.
Oracle 8.1.7 or similar versions may connect successfully using the same approach as for Oracle 10g [8]. However, here is a tried and tested approach with this older version of Oracle. The process is the same as for Oracle 10g but with the following changes:
You will need the Oracle JDBC driver. This is a file called “classes12.zip” and can be downloaded from Oracle (search for “Oracle JDBC driver” and look for “classes12.zip” for Oracle 8.17). It should be on the Oracle CD and/or in the installation directory.
You will need to have downloaded and installed the latest database driver Connector/J 5.1 [9] includes support for the latest JDBC functionality.
Open the Omniscope Database Connection wizard under File > Connect to database. Choose the generic "JDBC data source (advanced)" option on the first page.
Follow through the rest of the Database Connection wizard as usual, specifying a username and password, choosing a table, and optionally customising the SQL query.
You can set up a direct connection to many types/brands of database which the Database Connection dialogue does not explicitly support. Providing your database vendor offers a JDBC driver or ODBC connectivity, you should be able to use this to allow Omniscope to connect directly to your database.
If you are unable to get this to work, please post the problem on the forums [11].
If you are successful, please let us know what the settings were and where you obtained the JDBC driver from, so we can update our KnowledgeBase and consider adding explicit support for your database vendor to Omniscope.
Links:
[1] http://kb.visokio.com/kb/generic-db
[2] http://msdn.microsoft.com/en-us/sqlserver/aa937724
[3] http://msdn.microsoft.com/en-us/library/ms378428.aspx
[4] http://support.microsoft.com/default.aspx?scid=kb;en-us;313100#6
[5] http://support.microsoft.com/default.aspx?scid=kb;en-us;313178
[6] http://kb.visokio.com/node/367
[7] http://kb.visokio.com/kb/proxysettings
[8] http://kb.visokio.com/node/366
[9] http://dev.mysql.com/downloads/connector/j/5.1.html
[10] http://dev.mysql.com/doc/refman/5.0/en/connector-j.html
[11] http://forums.visokio.com/